
Recently, we launched the Cosmonic Control Technical Preview, giving platform engineering teams the chance to try our enterprise control plane for managing WebAssembly (Wasm) workloads in cloud-native environments.
Cosmonic Control integrates seamlessly with existing cloud native standards, technologies, and estates, so you can deploy and manage Wasm workloads with industry-standard patterns and tooling, such as GitOps with Argo CD.
In this blog, we'll take a look at how Cosmonic Control integrates with Argo CD, enabling platform engineering teams to manage ultra-dense sandboxed platforms with Wasm using their existing GitOps approach. Then we'll walk through deploying Cosmonic Control and a Wasm component with Argo CD.
Wasm-native and cloud-native
Building on the foundations of open source wasmCloud, Cosmonic Control unlocks the full power of the Wasm component model to drive new patterns like the platform harness, while running on Kubernetes and integrating with the wider cloud-native ecosystem.
In Cosmonic Control, Wasm component workloads and the wasmCloud system are represented by Kubernetes custom resource definitions, which are managed by Kubernetes operator.
That makes it simple to deploy and manage component workloads via GitOps, with Git repos serving as your source of truth for application state.
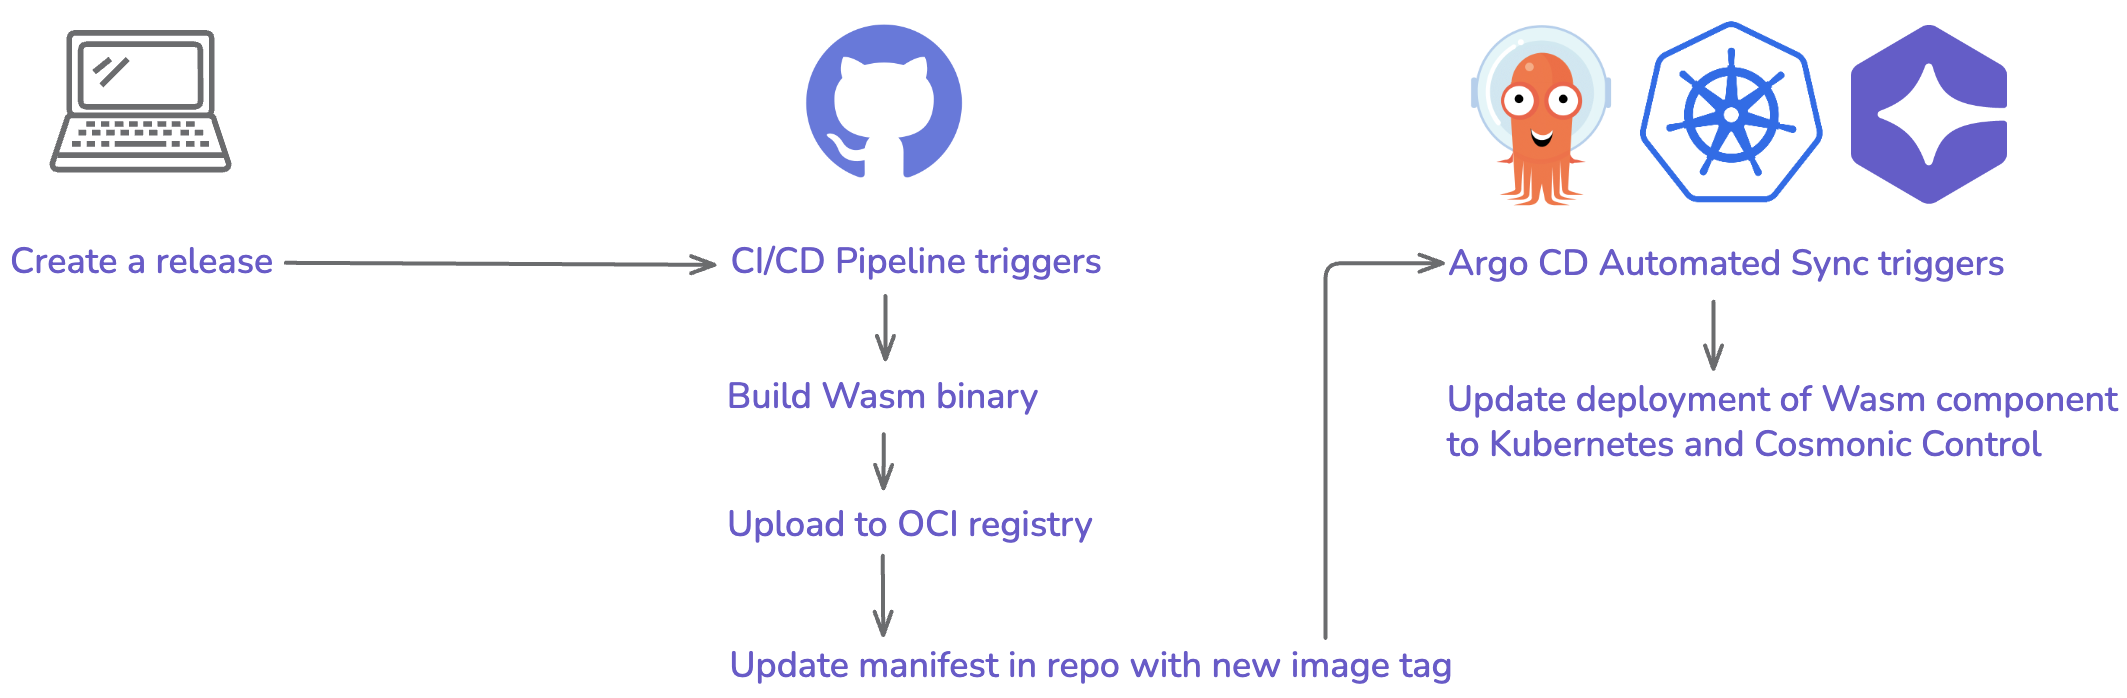
In this walkthrough, we'll create a flow in which...
- We create a release for a Wasm component in GitHub
- The release triggers a GitHub Workflow
- The Workflow run builds our Wasm component, uploads it to our GHCR registry, and submits a PR to update the image tag for our component deployment
- The manifest update triggers an automatic sync via Argo CD, which updates the deployed Wasm component to the latest version
Deploying Cosmonic Control with Argo CD
Let's try it out! In your local Kubernetes environment of choice (I used kind version 0.27.0 for this walkthrough), you can deploy Cosmonic Control in just a few steps. We'll deploy Cosmonic Control in Argo CD with a Helm chart, and then we'll create an Argo CD Application for a Wasm component in a Git repository on GitHub.
In order to follow these steps, you'll just need some basic Kubernetes tooling:
- Kubernetes cluster with CoreDNS. (
kindincludes CoreDNS by default.) kubectl- Helm v3.8.0+
- GitHub account
- Free trial key for the Cosmonic Control Technical Preview
1. Fork the demo repository
Head over to the control-demos repository in GitHub and create a fork of the repo. (Throughout these instructions, we'll assume that you use the name control-demos for your fork—everything will still work if you change the name, but remember to adjust the commands accordingly.)

It's up to you whether you'd prefer to clone the repo locally or work entirely in the browser. The only significant difference is that you'll need to copy and paste a few Argo CD Application CRD manifests if you work in the browser.
If you decide to clone the repo, navigate to the argo-cd subdirectory:
git clone https://github.com/<your-github-namespace>/control-demos.git
cd control-demos/integrations/argo-cd
2. Deploy Argo CD
You can deploy a simple example installation of Argo CD using the community-maintained Helm chart:
helm install argocd oci://ghcr.io/argoproj/argo-helm/argo-cd --set-string configs.params."server\.disable\.auth"=true --version 8.1.3 --create-namespace -n argocd
This Argo CD installation will run without authentication so we can jump straight into the example.
In your terminal, port-forward the Argo CD server in order to access the Argo CD dashboard. We'll use our local port 3000 for the Argo CD dashboard in order to leave 8080 for the Cosmonic Control Console UI.
kubectl port-forward service/argo-cd-argocd-server -n argocd 3000:443
You should see the Argo CD dashboard at localhost:3000. At the moment, there won't be any running Argo CD Applications, the high-level abstraction used by Argo CD for managed deployments.

3. Deploy Cosmonic Control
You'll need a trial license key to follow these instructions. Sign up for Cosmonic Control's free trial to get a key.
Use the following Argo Application CRD manifest in a file called control-proj.yaml to define your deployment of Cosmonic Control. (Remember to include your trial license key!)
apiVersion: argoproj.io/v1alpha1
kind: Application
metadata:
  name: cosmonic-control
  namespace: argocd
  annotations:
    # ArgoCD will apply this manifest first.
    argocd.argoproj.io/sync-wave: "1"
spec:
  project: default
  source:
    chart: cosmonic-control
    repoURL: ghcr.io/cosmonic
    targetRevision: 0.2.0
    helm:
      valuesObject:
        cosmonicLicenseKey: "<insert license here>"
  destination:
    name: "in-cluster"
    namespace: cosmonic-system
  syncPolicy:
    automated: {}
    syncOptions:
      - CreateNamespace=true
    retry:
      limit: -1
      backoff:
        duration: 30s
        factor: 2
        maxDuration: 5m
Apply the manifest with kubectl:
kubectl apply -f control-proj.yaml
Now we'll deploy a HostGroup in an Argo Application CRD manifest called hostgroup-proj.yaml:
apiVersion: argoproj.io/v1alpha1
kind: Application
metadata:
  name: hostgroup
  namespace: argocd
  annotations:
    # ArgoCD will apply this manifest first.
    argocd.argoproj.io/sync-wave: "1"
spec:
  project: default
  source:
    chart: cosmonic-control-hostgroup
    repoURL: ghcr.io/cosmonic
    targetRevision: 0.2.0
    helm:
      valuesObject:
        http:
          enabled: true
  destination:
    name: "in-cluster"
    namespace: cosmonic-system
  syncPolicy:
    automated: {}
    retry:
      limit: -1
      backoff:
        duration: 30s
        factor: 2
        maxDuration: 5m
Apply the manifest:
kubectl apply -f hostgroup-proj.yaml
The Applications will appear on the Argo CD dashboard. It may take a moment for the Applications to finish syncing.
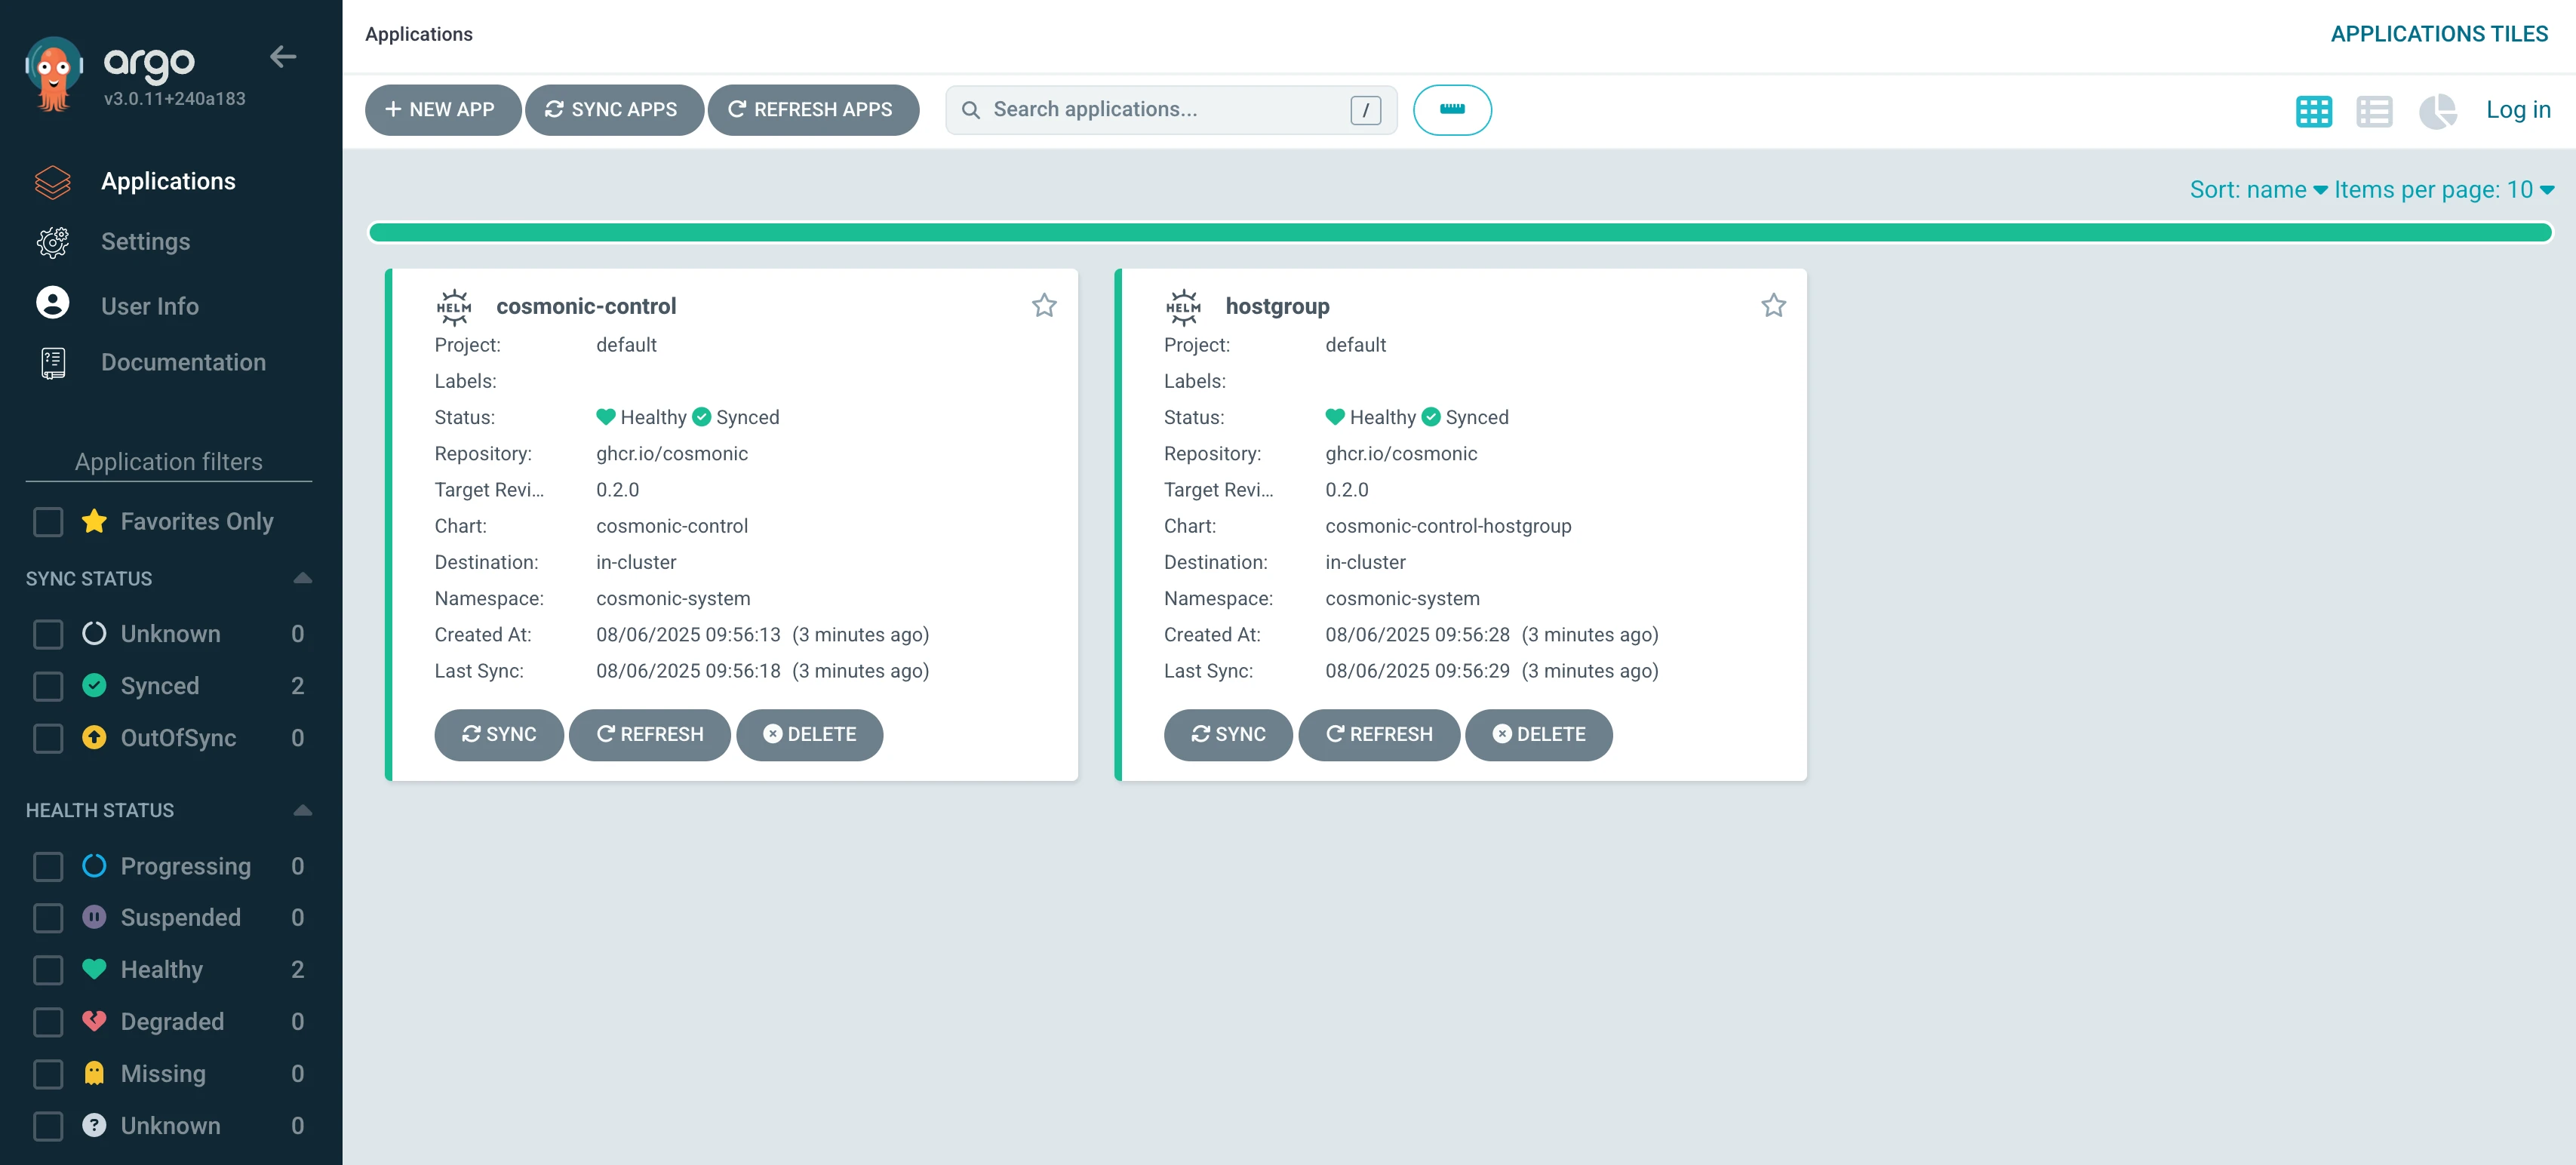
Once the Applications are synced and healthy, you can port-forward to access the Cosmonic Control Console UI at localhost:8080:
kubectl -n cosmonic-system port-forward svc/console 8080:8080
Now we have Argo CD and Cosmonic Control up and running, but we still don't have any Wasm workloads. Let's change that.
4. Trigger a Wasm component sync via GitHub release
Now let's try a more in-depth GitOps workflow to trigger a Wasm component sync with a GitHub release.
Deploy the hello-world Argo Application CRD manifest
Modify hello-proj.yaml to update the repoURL on Line 9 to target your new fork of the control-demos repo:
+ repoURL: https://github.com/<your-github-namespace>/control-demos.git
- repoURL: https://github.com/cosmonic-labs/control-demos.git
The Argo Application is now targeting a manifest file in the hello-world directory of your control-demos fork.
Let's take a quick look at that manifest:
apiVersion: runtime.wasmcloud.dev/v1alpha1
kind: Component
metadata:
  name: hello-world
spec:
  image: ghcr.io/cosmonic-labs/components/hello-world:1.0.0
  concurrency: 100
  replicas: 1
  hostSelector:
    matchLabels:
      "hostgroup": "default"
  exports:
    - wit:
        namespace: wasi
        package: http
        interfaces:
          - incoming-handler
      target:
        provider:
          name: http-default
          namespace: cosmonic-system
        configFrom:
          - name: hello-world-config
---
apiVersion: runtime.wasmcloud.dev/v1alpha1
kind: Config
metadata:
  name: hello-world-config
spec:
  config:
    - name: host
      value: "localhost:9091"
Don't make any changes at this stage, but note the OCI artifact we're using on Line 6: it's in the cosmonic-labs namespace and tagged 1.0.0.
Now apply the hello-proj.yaml Argo Application CRD manifest from integrations/argo-cd/:
kubectl apply -f hello-proj.yaml
You should quickly see the hello-world Application healthy and synced in the Argo CD dashboard.
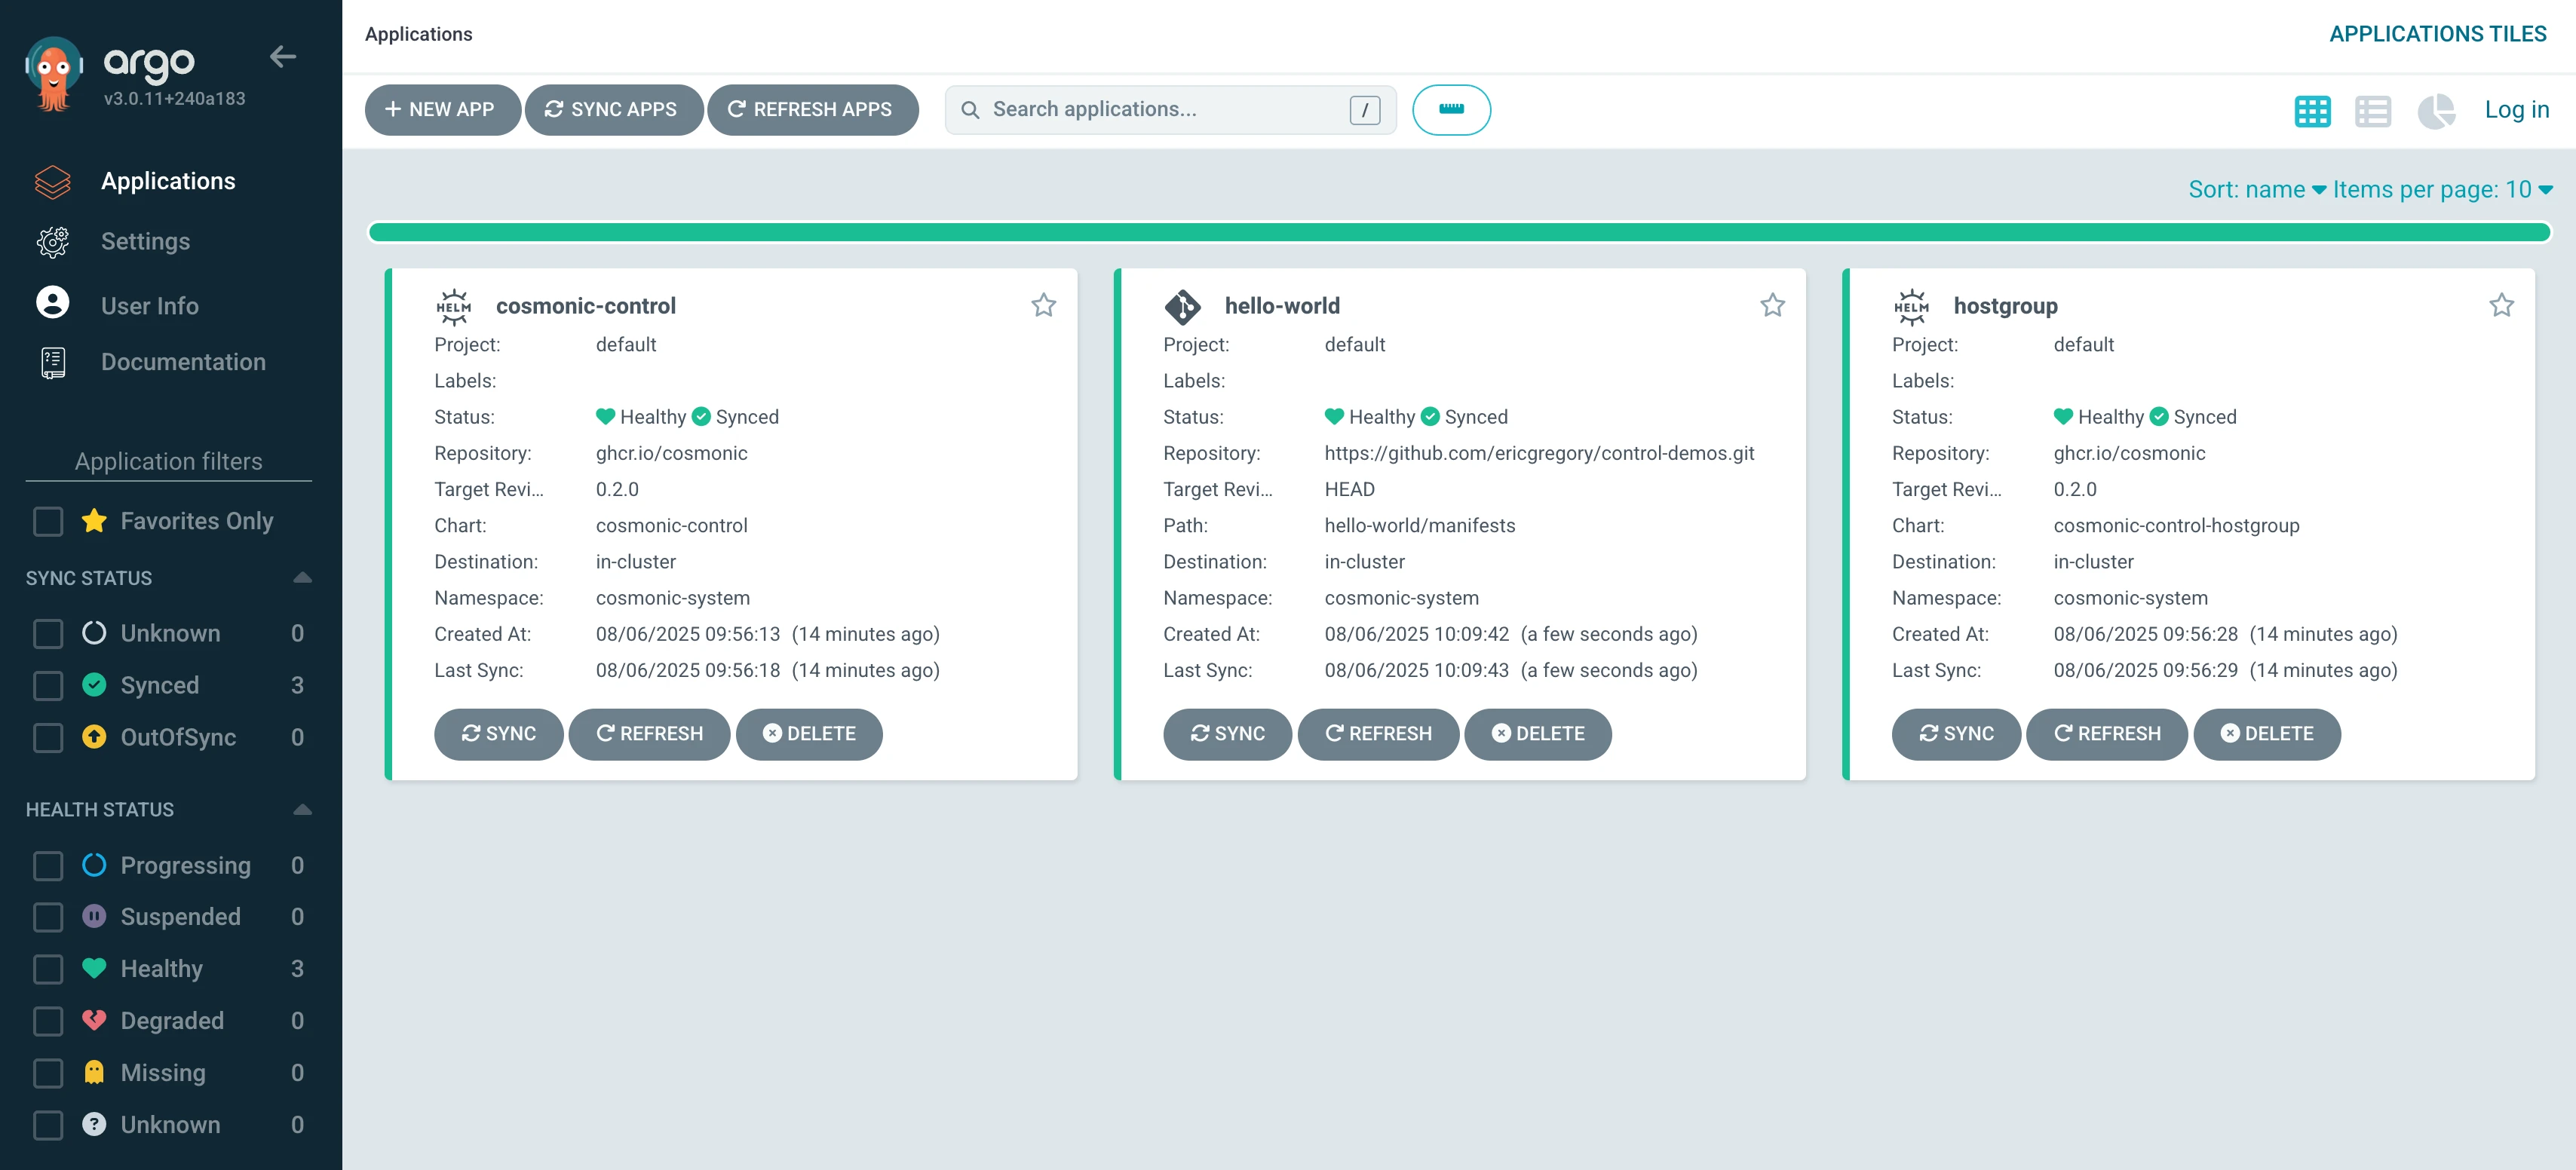
The hello-world Application is configured to Auto-Sync—when Argo detects changes to the source manifest, it will roll out an update to the deployment.
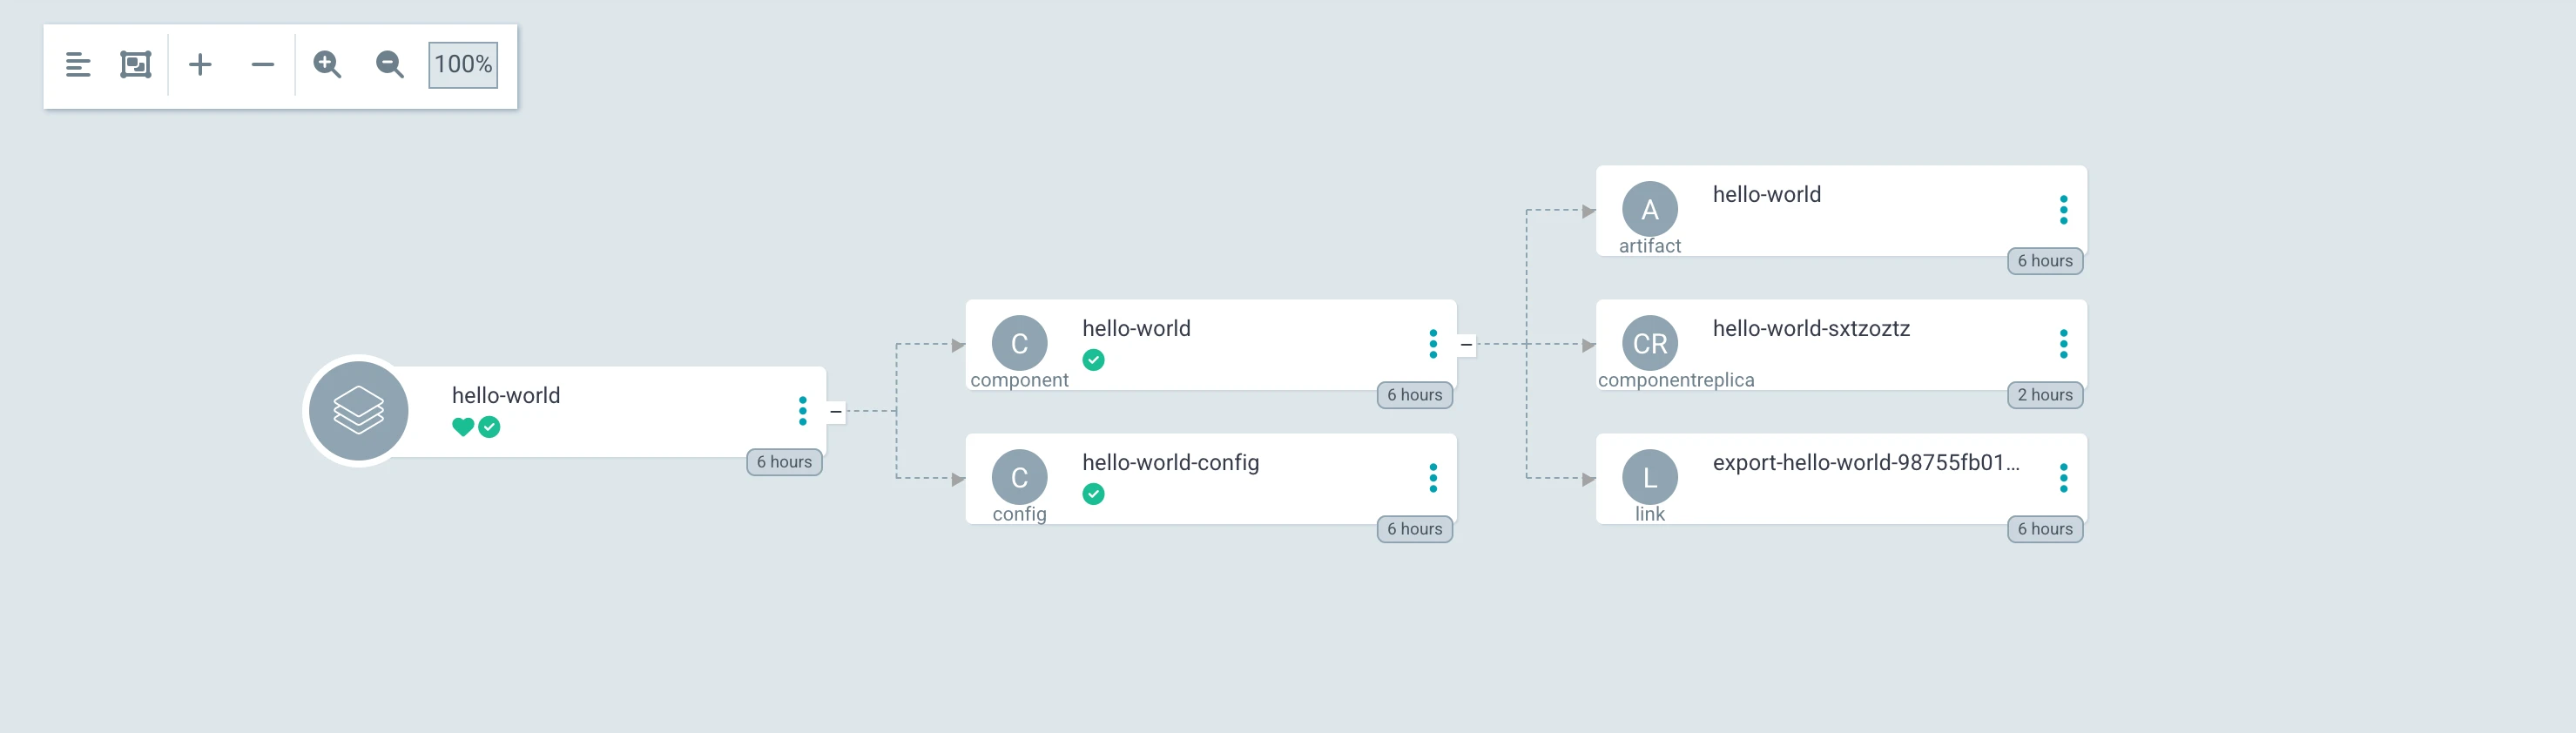
You can click on an Application to view it in more detail. Try clicking on the hello-world Application to view the resources defining the Wasm workload.
Optional: Modify the Wasm component
While not strictly necessary for the purposes of this example, at this stage you could use the GitHub web UI to edit the Rust code in hello-world/src/lib.rs and change the "Hello world" message, like so:
+ Ok(http::Response::new("Hello from Cosmonic Control and Argo CD!\n"))
- Ok(http::Response::new("Hello from Cosmonic Control!\n"))
If you decide to edit the message, commit the changes.
Create a release
Now we'll create a release in GitHub. Click "Create a new release" in the right sidebar of your control-demo fork's repository page, or navigate to https://github.com/<your-github-namespace>/control-demos/releases/new.

Let's call our release 1.1.0. Create a new image tag, title the release, and click "Publish release."
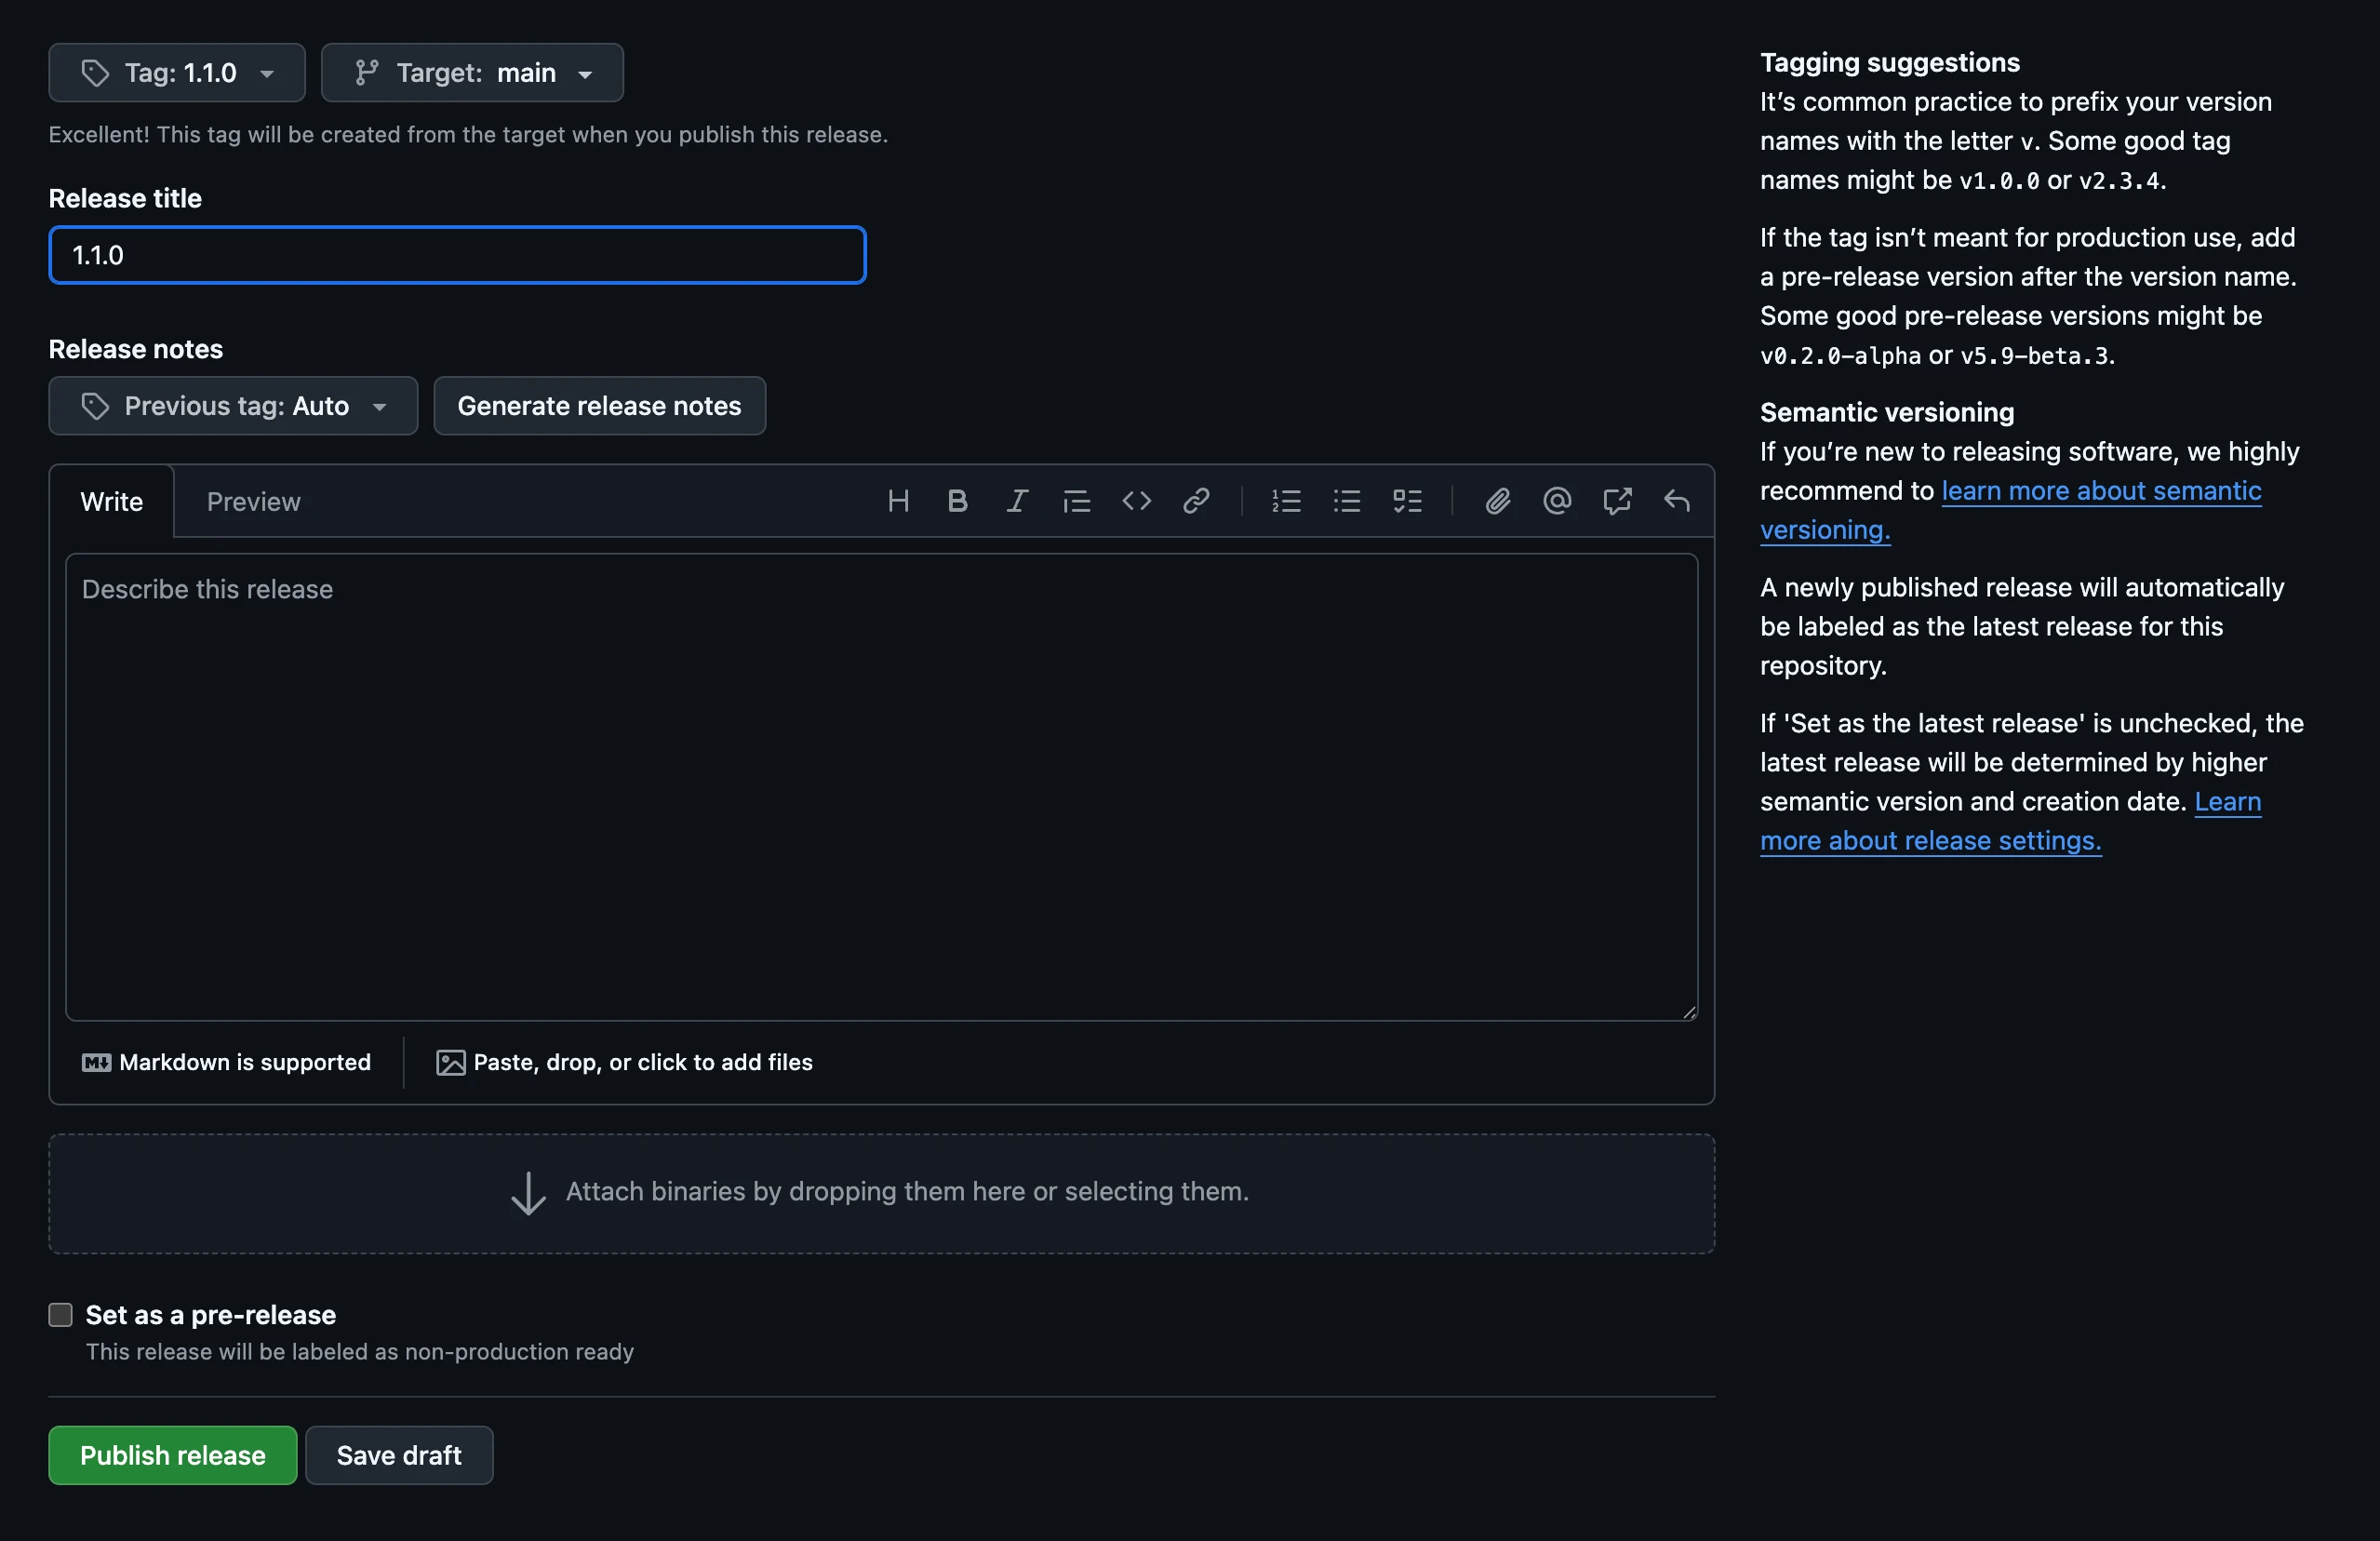
Publishing the release will trigger a GitHub Workflow. (If you'd like to watch the run, you can click the "Actions" tab for the repo and select "publish" under Jobs.) This workflow will:
- Compile a Wasm binary from the Rust code in the hello-world directory using the setup-wash GitHub Action
- Push the Wasm component to ghcr.io as an OCI artifact under your namespace
- Update the image tag in the component's Kubernetes manifest to reflect the version of your new release
- Commit and push the manifest update in your repo
Note: The first time this workflow runs in your repository, it will take several minutes to build the necessary tooling, but those tools will be cached—future runs in the repo will generally take under a minute.
In the meantime, let's take a look at the last steps of the GitHub Workflow file:
     - name: Update image tag in Kubernetes manifest
       working-directory: ./hello-world
       run: |
          DEPLOYMENT_FILE="manifests/component.yaml"
          OLD_IMAGE=$(grep "image:" "$DEPLOYMENT_FILE" | awk '{print $2}')
          NEW_IMAGE="ghcr.io/${{ env.GHCR_REPO_NAMESPACE }}/components/hello-world:${{ github.ref_name }}"

          # Update the image tag
          sed -i "s|image:.*|image: $NEW_IMAGE|" "$DEPLOYMENT_FILE"

     - name: Create Pull Request
       uses: peter-evans/create-pull-request@v7
       with:
         token: ${{ secrets.GITHUB_TOKEN }}
         commit-message: |
            Update image tag in manifest to ${{ github.ref_name }}
         title: Update image tag in manifest to ${{ github.ref_name }}
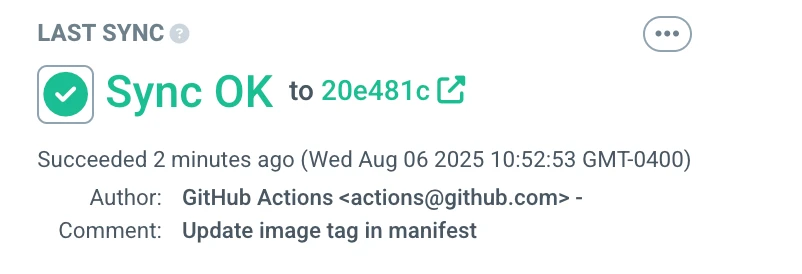
After building the component from your repo, the run submits a pull request updating the image specification in the hello-world manifest that our Argo CD hello-world Application is targeting, so that the manifest specifies a 1.1.0 image in your GHCR registry. This change to the manifest will trigger a sync in Argo CD.
Once the run completes successfully, merge the automated pull request, switch over to the Argo CD dashboard, and take a look at the hello-world Application. You should see that it has synced.
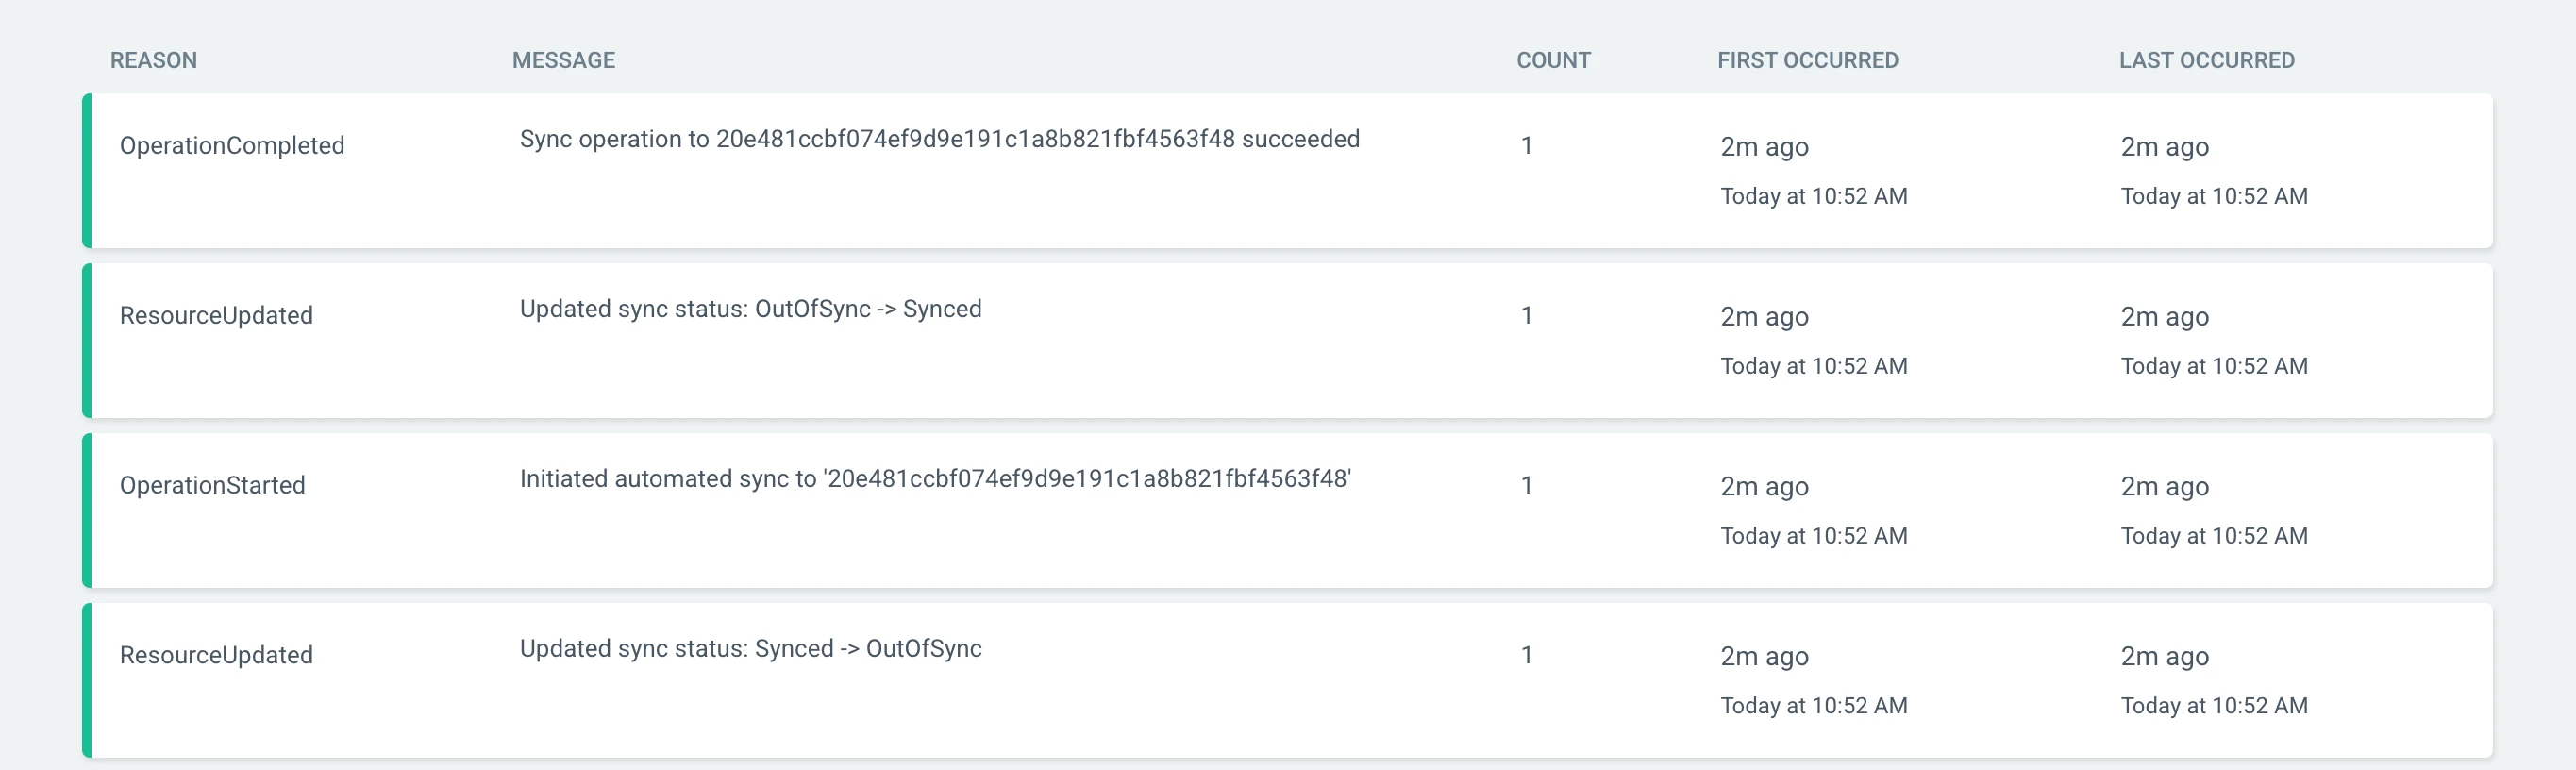
You can click through to see the commit that triggered the sync, or click on the Application at the left-hand side of the diagram and see the events associated with it:
Test the deployment
Port-forward to access the hello-world component at localhost:9091:
kubectl -n cosmonic-system port-forward svc/hostgroup-default 9091:9091
In a new terminal tab:
curl localhost:9091
Hello from Cosmonic Control and Argo CD!
5. Clean up
It's that simple. Once you're done, you can clean up your environment:
kubectl delete -f control-proj.yaml
kubectl delete -f hostgroup-proj.yaml
kubectl delete -f hello-proj.yaml
helm uninstall argocd -n argocd
If you're using kind:
kind delete cluster
Conclusion
With Cosmonic Control, teams can harness the power of Wasm components for entirely new patterns of ultra-dense deployment and composition-driven, polyglot development—all with their existing cloud-native infrastructure.
To learn more about Cosmonic Control, check out the documentation and start a free trial today.